Photographing a large wedding or how to shoot groups of people. Group and family portraits - professional tricks and shooting difficulties
Now let's talk about group photography.
Generally, there are three types of group photography. The first type - is official photos with a large number of participants. The second one is more informal shots of friends. And finally, the third type is a family photo. Let's look at ideas and poses for photo shoots in that order.
1. When working with large groups of people, you do not have the ability to control the posture or facial expression of each individual person. There is nothing to worry about, as long as you pay enough attention to the overall composition. Think of the whole group as a single entity. Make sure that all participants are clearly visible.
2. Often in a group photo session, the only possible composition that allows you to fit everyone into the frame is a full-length shot. Usually this is an official photo that captures an important event, so your main goal will be to make sure that all participants can be seen.
3. If possible, try to take the photo from a low altitude. You can go out to the balcony or climb into the car. The effort will definitely pay off, because instead of a standard group shot, you will get a photo with an interesting and non-standard composition.

4.
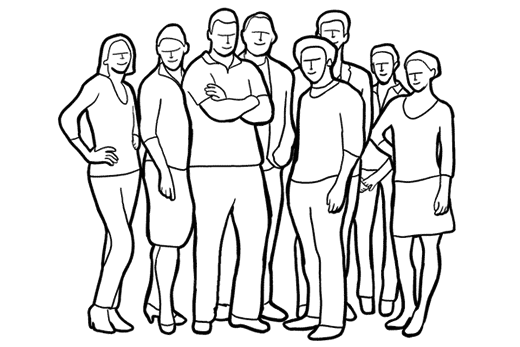
In some situations, people standing alone look more advantageous in the frame than a crowded company. It may not be the best option for a friendly photo, but it is great for a team shot, like a band or people working together on a project. If the team has a clearly defined leader, place him or her in the foreground for a more expressive composition.
 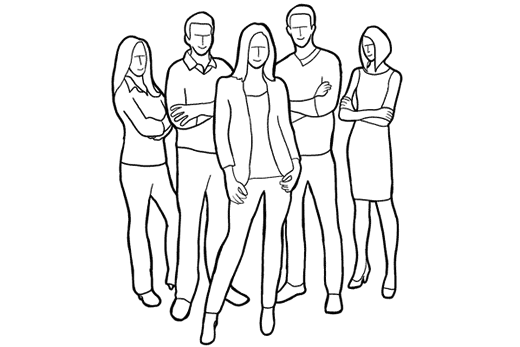
5. This is a pretty standard version of a photo of a group of friends. Yes, it's simple and a little run-of-the-mill, but it works. So why not?

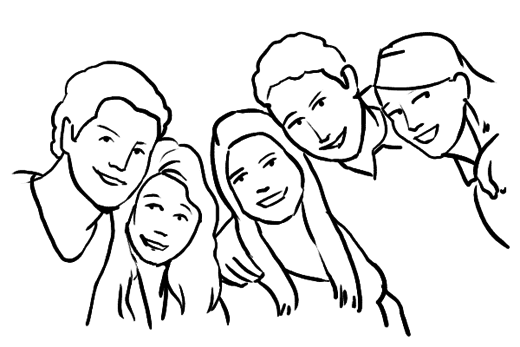
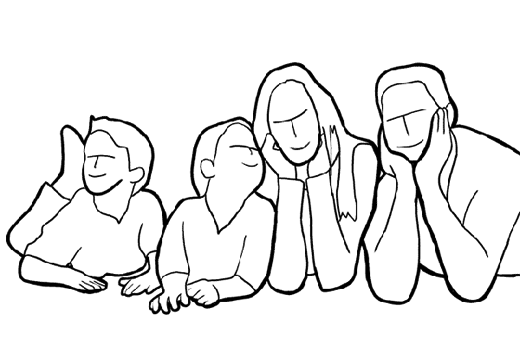
6.
This funny composition perfectly conveys the friendly relations between the participants in the picture. Ask people to stand closer and tilt their heads slightly towards each other and towards the camera.

7.
Ask participants to lie in a circle with their heads in the center, on the grass, outdoors or indoors. Shoot from above.


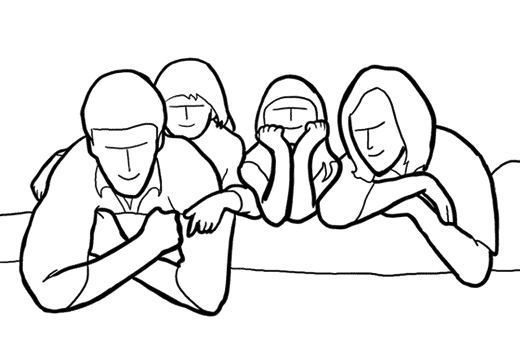
8.
A very simple and advantageous way to position a small group of people in the frame. Select the "group leader" and place him or her in front. The rest of the participants must join one at a time. Each of them should look into the camera from behind the previous one. Ask them to lean on the participant in front, this will add to the picture of soulfulness.


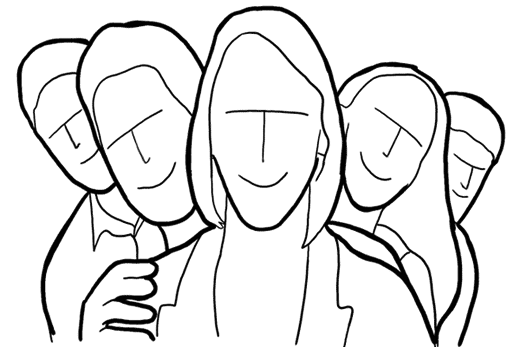
9.
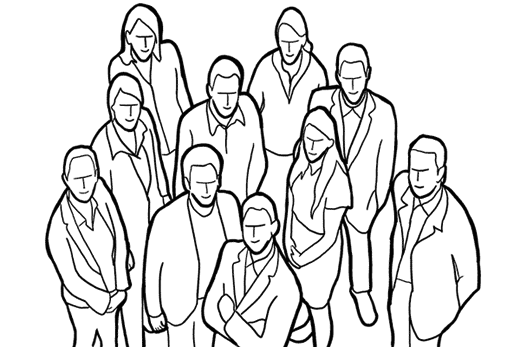
Variant of the previous pose. Place the leader forward and the rest of the participants so that they peek out from behind each other. Try experimenting with depth of field, and then choose which shots you like best - those where the focus is only on the leader or on all participants.

10.
A very fun way to capture a group of friends. For best results, ask the models to bounce after a short run.


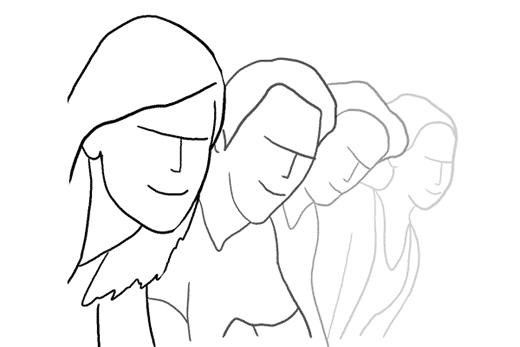
11.
A very profitable and interesting composition for a group of people standing in a row. Make sure you can see everyone clearly and shoot up close with a wide aperture and focus on the first person in the row. Indeed, distant participants will look blurry, but they will not be offended, as the result will be a very interesting and unusual group photo.

12.
To continue, let's look at examples of family photography. The most common location for taking a family photo is the sofa in the living room. It's not the most creative idea for a family photo, but it works great. The easiest way to diversify this standard composition is to trim it tightly around the edges. There is no need to make your favorite sofa and furniture in the living room full-fledged participants in the frame. Let the family members be in the photo, and only they.


13.
Here's another great idea for a family photo - get out in the fresh air. Sit on the front lawn, in the park or on the beach - all these places will serve as a great backdrop. Most importantly, do not forget that you should not photograph sitting people while standing. Crouch and shoot from their level.

14.
Family members sat comfortably side by side. Ask them to rise a little, leaning on their elbows. Shoot from a lower angle.

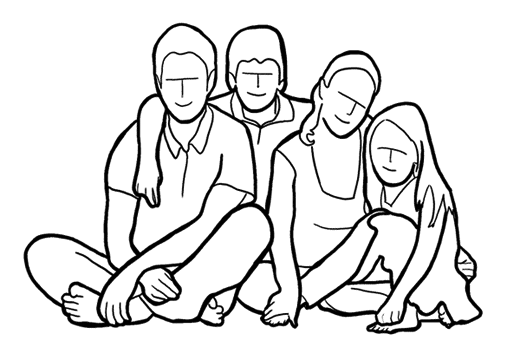
15.
Very nice composition for a family photo. The shot can be taken both outdoors and at home on the bed. Looks equally good with any number of children.


16.
A cozy pose, the family comfortably settled on their favorite sofa.


17.
For an interesting and unusual shot, you should diversify the photo on the couch a little. Just take a photo from the back of the sofa and you will see that the frame looks completely new.


18.
Option photo from the back of the sofa.

19.
Very nice family photo. Ask parents to ride their children on their backs.


20.
A very simple pose for a full length shot. Equally well suited for any number of people.


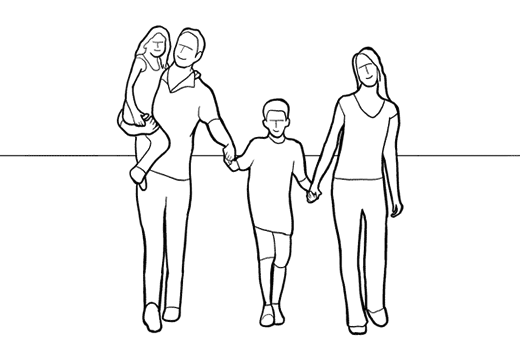
21.
Add a shot of a family holding hands while walking outdoors to the photo shoot. Take a series of shots and choose the photo with the best position of the legs. Use AF tracking to capture this shot.


In conclusion: be original and try to diversify these poses with your own ideas. Think about how to adapt one or another standard pose to the location and scenario of your shooting. Use our ideas as a runway for your own creativity!
I am sure that the reading will be useful not only for wedding photography professionals, but also for all those who want to improve their skills and / or just learn how to competently shoot groups of people on the holiday. In the article, I want to highlight 12 tips so that you can create interesting photographs if you are facing numerous eyes of the portrayed.
One of the most common types of photography is a group photo.
Such shots are typical for weddings, travel, sports, school events, etc.
In the world every day, people take thousands of photos in which you can see two or more people. However, unfortunately, many of the pictures that I see posted on social networks on the Internet do not evoke any positive emotions in me, leaving me indifferent. To be more precise, such shots often fill the teeth. There are many objective reasons for this disappointment.
Common photo-errors of group portraits can be expressed as follows:
- the views of the portrayed are directed in different directions, because of which the picture loses its “center of gravity”;
- someone at the moment of photographing blinks or closes his eyes;
- parts of the body of someone are visible in the frame, but there is no face, or the head is partially “cut off”;
- people are too far from the camera and they are almost invisible, or vice versa, they are so close to the lens that some of them simply do not fall into the frame, while the photo may be blurry due to a focus error.
Despite such obvious mistakes when photographing groups of people, as a wedding photographer, I have identified simple tips that will help you improve your professional level in getting beautiful shots that you are sure to be proud of.
And even more so, I consider it unacceptable to commit such flaws at solemn events. Eg, wedding photographer you just have to remember these things.
1. Preparation.
Few people like to wait. So don't test the patience of those you shoot. You just have to be prompt and prepared to take pictures. This means that you should immediately pay attention to the following:
the location of your photoshot;
imagine how you can arrange people;
the camera is ready for combat: uncovered, the correct lens attached, the battery is charged, the flash may have been prepared.
2. Location.
The location chosen for the filming process is important for a number of reasons. For example, for sprinters, the frame of their competition on the treadmill a moment before the start will be characteristic: readiness, tension, endurance. And, you see, the photograph of these runners in front of a brick wall will turn out to be completely meaningless. Another reason for choosing a location is to make sure the background matches the intent of the shot: it shouldn't be distracting. Thus, keep the aesthetics of the background in mind.
Choose a location that meets the conditions for normal shooting, where there is enough light for the shot and where there are no problems with the background. Also avoid backlight, unless, of course, this is the author's creative idea.
3. Continuous shooting.
One good way to avoid problems when someone in the group turns away/blinks/closes their eyes is to quickly take several photos of the same subject. I often switch my camera to continuous shooting mode. And I find that the first shot is often useless, but one or two in a given series will certainly be successful.
I also shoot people “before” the moment when I ask them to get together. Since the very moment of preparation is quite interesting. I use this technique even after I give a "light out" and say that "I took everything off, thank you." In the meantime, I press the camera shutter. As a result, I have non-staged shots when the lyuli are natural.
4. "Comfortable" distance.
Try to get as close as possible to your subjects so that, firstly, you maximize the best technical capabilities of your optics, and secondly, so that everyone naturally enters the frame. By getting closer to the subject, the photographer thereby achieves greater detail, which means that the portrait will turn out to be more contrasting and expressive.
5. Group formation.
The most familiar and correct when forming a group of people filming is the situation in which the taller ones are located behind. But there are other points that can be taken into account for a harmonious frame. The heroes of the occasion (if we are talking about a wedding) are best placed in the center, which will give significance to these figures. In addition, to enhance the effect, you can ask all those present to look at the young, thus. enhance visual attention.
Taller participants in the photo shoot can be placed at the edges, and not just in the background.
Try to minimize the distance between the rows of guests. If they stand in two rows, then between the first and second, if there is a third row and even a fourth, then, respectively, between all of them. This will make it easier to work with aperture, which means it will affect the sharpness of the entire photo, when not only people in the foreground, but also in the background will be in focus.
Ask everyone to raise their chins a little higher than usual, this will visually remove “double chins” in the photo.
6. Timing.
Those participating in the filming process are subconsciously waiting for some signal from the photographer that right now he will press the shutter, and prepare for it: they make noise, take a pose. There comes a moment of calm - a kind of hint to the photographer that most of it is ready, which means it's time! And indeed, this second it is better to make continuous shooting. But I repeat that both “before” and “after” this moment you should not stop taking pictures. Or say out loud: “Oh, something didn’t work out!” Thus, to discourage people, to attract their attention, to surprise, so that emotions change on their faces. And now have time to shoot them until they become again, indignant, and most importantly - do not disperse! This trick works amazingly!
Try, for example, at a wedding to make group portraits before the buffet table, while the guests are still sober.
To get enough detail in your photo, you need to have enough light when taking the photo. Do not neglect the flash, not only in the dark, but also in bright sunlight to remove harsh shadows from faces.
Try to avoid situations in which people squint from excess light, take them into partial shade.
8. Organization.
I know how easy it can be to lose control of a group of people. Sometimes this happens for objective reasons, but sometimes it happens that the photographer himself is slow, late, not sociable, thinks about something else, etc. It is important not to lose contact, to state tasks clearly and in a simple way, to be polite but persistent. Be sure to thank people for their participation with a kind word.
9. For large groups.
In fact, photographing several dozen people at the same time is not an easy task. But often the solution to this problem lies in a different plane, in the truest sense of the word. It is worth changing the shooting angle: position yourself from above - climb to a higher point, stand on a bench, on a parapet, even climb a tree or a ladder. In addition, it gives an unusual perspective to your photo shots, and you can capture a much larger number of people in the frame from a height.
Don't forget to shoot with wide-angle lenses.
10. Use a tripod.
There are a number of reasons why a tripod can be quite useful when photographing people. Firstly, the presence of a tripod in itself informs those present that photography is a serious and responsible matter. And besides, it attracts attention. It's amazing that a professional-looking photography kit can get people respectful of what's going on and mentally prepared to take part in a photo shoot. Secondly, a tripod gives you more freedom, expanding the boundaries of manipulation with shooting modes.
11. Use the services of an assistant.
If you have to organize a large group of people for filming, then an assistant is needed here at the right time.
An assistant is often an indispensable person at a wedding when you have to photograph the relatives of the bride and groom, friends, etc. When you need to organize invitees into different kinship groups for portrait shots. In these cases, I often ask the newlyweds to send one of their relatives as assistants to me, who would be able to quickly, competently and tactfully organize guests for photography without delay. I ask such a person that no one be forgotten and missed. Having a helper from a family member ensures that you, like good wedding photographer, consider everyone. In addition, they listen carefully to the assistant and fulfill his requests with great willingness, since the invitees are familiar with him.
12. Smile!
Yes, you should smile! There is nothing worse than a grumpy, tired photographer. Have fun and enjoy the process of taking pictures and you will see that people will be kind to you in return. I usually come home from a wedding I just worked at with my facial muscles incredibly tired from smiling. I find that in some cases my smiles and joy for the couple help the couple to relax and show their sincere positive emotions. It really works!
Discover the knowledge by reading articles on "Tips for a wedding photographer".
It's time for a group photo. All group photos can be divided into three types. The first includes collective photographs of people, sustained in a strict, official style. The second includes less formal shots with friends. And the third type of group photo is shooting with family members. Below are examples of group photography poses and tips for those who want to learn how to take photos with multiple people.
Similar posts on our site:
1 . When you have to work with a large number of people in the frame, it is very difficult to follow the posture of each person. This is not required - try to focus your attention on the composition in general, try to imagine the whole group of people as a whole. Make sure that the faces of each of the participants in the group shot are visible.
2 . It so often happens that when trying to capture all the people in a group photo, you cannot do without a full-length composition. Such pictures are usually formal in nature and here, again, the main emphasis should remain on the clear visibility of all faces.
3 . If possible, try to take a picture while towering over your subject. Take advantage of the balcony or climb on the car, an unusual angle can suddenly enhance the photo, make it more lively and emotional.
4 . On some frames it is better to place the participants separately from each other than to collect them in a "friendly" company. This technique is great for taking a picture of a small team, a musical group, or work colleagues. If the group has a leader, it should be brought to the fore and, thereby, strengthen the composition.
5 . Pretty standard framing for shots with friends, right? But if it still works, then why not use it?
6 . The position is ideal for a group of close friends. Ask everyone in the group shot to stand closer to each other, lean their heads back and lean slightly towards the camera.
7 . In nature or at home, ask friends to lie down so that their heads form a general circle while you shoot them from above.
8 . The atmosphere of mutual support will be created by the following composition: put the leader of the team in the foreground, ask the person following him to look at the camera over the shoulder of the person in front and, bending slightly towards the lens. In this sequence, one by one, line up all the people in the frame.
9 . The above position can be played up by changing the depth of field. Again we put the leader of the group in the foreground, and we line up the rest of the participants behind his back and ask them to look into the lens, leaning in a checkerboard pattern. Take pictures with different apertures, later, on the computer, sort photos with the focus on the leader or colleagues behind him.
10 . For a positive and dynamic shot for close friends, ask them to jump while holding hands after a short run towards the camera.
11 . An interesting composition will come from a small group of people lined up in a row. Make sure all faces are clearly visible and in frame before shooting. Position yourself near the person in the foreground and shoot wide open. Of course, the faces of those furthest in the row will be blurred, but they cannot deny that the end result is worth it.
12 . Some tips for family photos. Most often, you have to shoot at home, on your favorite couch - creativity is inappropriate in such an environment, but a few tips will quite help save a family photo. Try to fill the frame tightly with all family members, and only with them, and not with home furniture or carpets, no matter how expensive they are.
13 . A good place for a family photo is a park bench or a sandy beach. Do not forget that seated people need to be removed from the same level as them.
14 . Ask family members to lie down on the floor and lean against each other, propping their heads up with their hands, while you yourself take a low point of view.
15 . A universal position for any number of family members, it can be built both in nature and at home, lying on the bed.
16 . A homemade photo of a family comfortably nestled on their favorite couch.
17 . A non-standard shooting angle will help to diversify a family photo on a home sofa. Take a position behind the back of the couch and ask all family members to turn to face you.
18 . Another version of the frame from behind the back of the sofa.
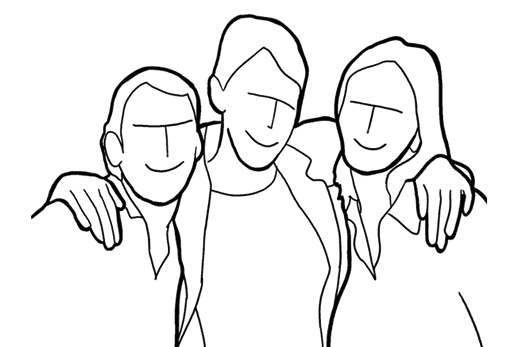
19 . An absolutely universal way to take a family photo with children - just ask the kids to hug adults by the shoulders.
20 . The simplest pose for a full-length photo, suitable for any number of people in the frame.
21 . When photographing a family on a walk, ask them to hold hands and set the camera to continuous shooting mode, keep focus as the subject approaches. After downloading the photos to your computer, sort out the best shots in motion.
And the last tip - fantasize, change the frame setting until you get exactly the result that you need for your conditions and subject. Let the traditional positions be the impetus for your own discoveries!
The article was prepared based on the materials of the siteImagine that you need to place something in one place that cannot be physically placed in this place, and not only to place, but also to photograph. Well, first things first.
As a professional photographer, I was invited to take photographs of the solemn event. Photographing the presentation of gifts, the exchange of welcome speeches and congratulations. What would seem easier? Ordinary reportage photography, well, somewhat burdened by the presence of important people and nothing more. But, according to the plan of the organizers, after the end of the solemn part, before moving all the invited celebrities directly to the banquet, a group photo was supposed to be taken in the hall, against the background of symbols representing the venue of the solemn event. At a preliminary meeting, where the issue of the time of the event, the importance of those present, etc. was discussed. it became clear that it was not possible to place a group with the declared number of participants in the hall. Even if you use the placement in two rows, put the first row on chairs, and the second standing behind those sitting. The width of the group did not fit from wall to wall. The columns located in the center of the hall overlap lined up people, and if you place them in front of the columns, then the distance from the photographer to the photographed will not allow them to fit into the frame at any focal length of the lens used.
Changing the place of photography, reducing the number of photographed faces were not even discussed. The photographer has been given a task and be kind enough to complete it.
After some thought, the idea flashed through to use the elements of panoramic photography when photographing a group. I had not done such things up to this point, so I had to very carefully, in nuances, think through all the technical and organizational steps to implement the decision. In order for the sizes of people in the finished photograph not to differ from each other, it is necessary that the distance from the camera to each person in the series of photographed be the same, i.e. it was necessary to place the group in the form of a semicircle with the photographer in the center. We set up a tripod with a camera on the panoramic head, arranged the chairs in a semicircle, and carefully leveled them with a measuring rope tied to the tripod with a knot (like a compass).
Before photographing, we set the lighting evenly over the entire length of the group. In this case, when overlaying frames, the borders by illumination will not be highlighted. I installed three halogen lamps with reflective umbrellas directly from the camera. The middle lamp is directed in the center, the left and right ones are slightly deployed in the respective directions. The umbrellas created soft, enveloping light without harsh shadows. 
Since it was necessary to photograph the group in parts, and then collect the panorama in the program, the use of a panoramic head and a large number of takes (series) is necessary. We photograph people. Despite the request not to move, someone will definitely start to itch, move their hands or head. When assembling, you will have to take a segment from another series, respectively, you need the segments to match in borders and scaling. The distance to the subjects of photography is small, there are many details in the foreground. To avoid splitting the image, it is necessary to carefully install the camera. The camera must rotate around the "nodal" point located on the optical axis of the lens. Although this point needs to be determined in advance, as its location varies from lens to lens, it never hurts to check the correct setting just before taking a photo.
Ways to find the "nodal" point are described in detail on the Internet, but in short, then:
we place two small objects about one and a half meters from the camera at a distance of 50 centimeters from each other so that when looking through the camera viewfinder, the objects overlap each other;
when turning the camera on the head to the left and right, the objects should remain overlapped, if both objects appear in the frame, then the camera is shifted along the optical axis forward or backward, and corrections must be made;
the smaller the objects, the more accurate the installation is. Without a panoramic head, this effect cannot be achieved.
When photographing a group, we make at least three or four passes (series) from the left edge of the group to the right and vice versa. The panoramic head allows you to take the same number of frames per pass, without shifting, with the necessary overlap of frames, with a clear fixation in the center of the group. This eliminates the possibility that in the future it may appear that the photographer was not standing in the center of the group, but was photographing from the side.
If you follow all the nuances I have listed when taking pictures, then after assembly, the group appears almost flat against an unrealistically unfolded background.

The photograph is rather unusual. You can argue about the correctness of the chosen method of solving the problem, you can offer your own, perhaps the best way. However, you must admit that the presented photo is not quite ordinary. It has an element of surprise. The customer will definitely appreciate it. The head of the department, who was responsible for organizing the photography, was also directly involved in the process of decorating the premises where the photography took place. He liked the photo. I liked how interesting the room looks, how they positioned the group for photography. And I made a similar photograph a few more times. Those. received a paid order several times.
When shooting individual or group portraits, a novice photographer faces many difficulties. After all, not every photo with smiling faces can be called a good portrait. Here are some general tips and tricks to help you take better and better portrait photos.
Portrait lenses
A good portrait, in principle, can be made with any camera, but there are certain preferences in terms of the choice of optics. It is recommended to photograph portraits with lenses with a focal length range of 70 - 135 mm (35 mm film equivalent). We recommend that you refuse to use a wide-angle lens, as it will distort the facial features and proportions of the figure. Preference should be given to fast and autofocus lenses.
Lighting for shooting one person or a group of people
The key point when shooting a person or groups of people, of course, is lighting; your task is to achieve such lighting that the shadows on the face of the person being portrayed would disappear, or they lay exactly on those parts of the body or figure that need to be hidden. Thus, competent light control allows you to hide something, and emphasize something. The best light for portrait photography is natural light.
If you're shooting indoors, it could be soft, diffused light from an open window. When shooting outdoors under the daylight, you can use white or silver reflectors to remove shadows and make the lighting more even. In cloudy or cloudy weather, the lighting is soft, even and there will be no problems. The only problem with shooting with natural light is that you can't set the light on your own, you have to rely on the sun alone. But by positioning the model at one angle or another relative to this light source and using reflectors, you can get great results.
When shooting indoors or in the studio, we recommend that you still refuse to use the flash. With its hard, directional light, it can "kill" any portrait photograph, creating rough shadows and making a person's face flat, inexpressive. Instead, you should use incandescent lamps or illuminators of various designs. With their help, you can create a key, fill, backlight, background or modeling light.
There are a lot of lighting schemes for shooting a portrait indoors. For example, you can place two light sources at some angle to the one being portrayed, as a result of which the photographic image will turn out to be more voluminous. A more complex option - one light source is directed at the object from the height of the camera, the other shines at an angle to the person being portrayed from a height of about 2.5 meters. In addition, the human head is additionally illuminated by a posterolateral beam of light. And the background is illuminated by another illuminator. This lighting scheme allows you to create a portrait with an interesting black and white pattern.
Choosing the right angle and shooting point
A common mistake novice photographers make is choosing the wrong angle and shooting point. The height of the shooting point plays an important role and largely depends on the features of the image and the person being portrayed. But, as practice shows, the best results are usually obtained when shooting from the model's eye level. This means that if you are photographing a child - sit down, if you are photographing a person taller than you - stand on something, or move a little further away. Photographing from extremely low and high points somewhat distorts the proportions of the body and face.
Sharpen the foreground - blur the background

The background or surroundings may not matter much when shooting a portrait, or they can help you to create a certain emotional atmosphere of the picture. In any case, when shooting a portrait, it is worth visually isolating the model from the background using the depth of field control. Use the background blur bokeh effect to make your portrait photography more beautiful. This is easy to do - you need to open the diaphragms as wide as possible. The smaller the f-number, the more the background will be blurred. Also blurring the background contributes to the increased focal length at the same aperture value. If you decide to highlight the person being portrayed in the photo by blurring the background, then use the aperture priority mode, in which you can set the aperture value to your liking.
Choosing the Perfect Pose
You can list many poses that can be used when shooting a portrait. It all depends on the characteristics of the person being photographed and the ideas of the photographer himself. When choosing a pose, the main thing is to solve several specific and fairly common problems. In particular, hunched shoulders, which is very common in both men and the fair sex. In this case, you can ask the person to lean their shoulders against the wall and slightly open their chest, sticking out their stomach a little towards the camera. This pose will balance the proportions of the waist and torso.
Another problem is the stoop, which looks extremely unattractive in the frame. To solve it, advise the person being portrayed to imagine that a rope is tied to his head, which goes from above and pulls him up. To solve the problem of a protruding chin, ask the model to slightly change the position of the head and point the forehead into the camera. However, the main problem when shooting a portrait usually arises with the hands - where to put them so that they look organic in the photo? After all, the hands can easily upset the balance and balance of the picture. The most classic option in portrait photography is when the hands are brought up to the face. But here you can experiment to determine which position of the hands and fingers best suits your model and matches the content of the photo.
Focusing on the eyes

Of course, the main thing that should turn out sharp in the photo is the person's face. But if you focus strictly on the center of the face, that is, on the tip of the nose, the results will be unsatisfactory. The nose will be sharp and well detailed, but the eyes may go into a slight blur. There is only one way out - to focus on the eyes of the person being portrayed. However, you need to keep in mind that when shooting a portrait, a person’s face is rarely located strictly frontally, most often you photograph at some angle. Accordingly, one eye is closer to the camera lens than the other. It is on this eye closest to the photographer that it is worth focusing. To accurately focus, you can use focusing on one point (center). In this mode, focus on the model's closest eye by pressing the shutter button halfway and move the camera to compose the shot.
The direction of the model's gaze can be determined by the photographer. The classic version is when a person looks directly into the camera lens, and thanks to this, a certain connection is created between him and the viewer. But no less interesting is a look behind the frame, when the viewer begins to think about what is there in the distance, where the person’s gaze is fixed. Wherever the model's gaze is directed, make sure that the whites of the eyes remain sharp and clearly visible in the photo.
Taking a group portrait
Shooting several people in a frame is more difficult than taking a portrait of one. There are far more details to pay attention to than when shooting a single person. Firstly, your primary task is to carefully ensure that people do not overlap each other, each participant in the shooting must fit organically into the frame. When shooting a group portrait, it is also advisable to use standard optics. But if there are a lot of participants in the shooting, and there is little free space, you can use the wide-angle. However, please note that a wide-angle lens may slightly distort the figures of people close to the camera.
The optimal solution for photographing groups of people is the burst (continuous) shooting mode. Take plenty of shots using burst mode to avoid blinking and unexpected accidents. Thanks to this, you will have more opportunities in post-processing - it will be possible to combine individual frames, for example, by copying a successful facial expression for a blinking or turning away person. Of course, continuous shooting should be done with a camera mounted on a reliable, stable tripod.
When it comes to lighting, the same rules apply for group portraits as for a single portrait. But you should pay attention to the fact that none of the participants in the shooting cast a shadow on others. Another technical nuance - do not abuse the shallow depth of field, because often as a result of this one of the people participating in the shooting is blurry, not clear in the photo.
Of course, an important part of shooting here is the composition and location of people in the frame. How to properly arrange the models so that the faces of all the people in the frame remain clearly visible? The greatest difficulties usually arise when there are people with a noticeable difference in height in the frame. In this case, the classic options apply. The tallest should be placed in the background while standing, adults of medium and short stature - in the center and along the edges, children - in front. Or you can seat the tallest on chairs or a bench, and put children in their arms. Behind them are people of average height. If you are shooting people of approximately the same height, then you should not arrange them in one line. It is better, again, to seat someone, to place someone standing behind their backs. If the shooting is carried out on the street, then to place the models at different levels, you can use any natural or artificial elevations, such as steps.

When shooting groups of people, the compositional solution can be built in such a way that the location of the models in the group, or the combination of their faces, forms a certain geometric figure, for example, a triangle. After all, when people in the frame are simply arranged horizontally, the frame looks boring. Another interesting option is the arrangement of faces in the frame along the diagonals.
Don't forget to use different camera angles and take different shots. For example, when shooting a large group, an upper angle can look advantageous. As in single portraits, pay special attention to the hands. They should not just hang inactive along the hull. Hands should emphasize a certain pose, be busy with something, or hands can bind people together and, accordingly, the whole composition.
