Kegel exercises to contract the uterus after childbirth. Exercises to contract the uterus - how to recover faster after childbirth
2. You should have a fold in the shape of the letter X at each end of the rectangle. Now you should form each corner so that the result is a multi-layered triangle. To do this, you need to fold each of the two inner corners to the center of the letter X, bring the corners together and press them in a little.
3. For the second end of the rectangle, repeat the same steps. This should be done from the “wrong” side so that a double-sided arrow with sharp ends is ultimately formed, but these ends should be located in opposite planes to each other.
4. Bend the corners of the upper part of the “arrow” so that a diamond is formed on one edge, which is made up of two corners.
5. Bend one of the corners on the opposite side so that it connects with the bottom, and bend its edge upward. You will have a flap that needs to be bent in the opposite direction. Repeat the same action with the other corner. On this side, you will also end up with a diamond shape.
6. Place the product with the wide side facing you, lift its side parts and insert one part into the other. An arc is formed with paper valves attached to the top. The formed arc is your paper tank, at the top of which there is a real “tower”.
7. The tank is almost ready. All that remains is to add tracks and a muzzle (gun) to it. The missing parts are quite simple to make: bend the side edges of the tank and form tracks from them. To make a paper muzzle, roll up a tube and insert it into the hole in the “turret” of the tank.
Now the paper tank is done!
Also watch the video on how you can make other tanks out of paper!

If you use the knowledge on creating paper tanks from this article, then you will definitely succeed. Happy paper tank making!
We all know very well that children love military equipment. Today we will talk about the tank. But the conversation will not be about a metal military machine that works on the battlefield, but about a paper craft, a toy. Boys are the future defenders of the Motherland, the country.
Making a paper tank is extremely interesting. So, it is necessary to tell how we will make crafts of military equipment with our own hands. To work, you will need PVA glue, colored paper (cardboard) in green and red, and, of course, scissors. As an addition, take a pencil and ruler.

Paper tank for beginners, master class
Initially, we begin to create tracks for the combat vehicle. Two strips of paper are cut out three centimeters wide and 22 centimeters long. Next, you need to carefully bend the strips to make a ring. We glue the edges with PVA.

A rectangular shape is cut out of green paper. We take the dimensions 8 by 14 centimeters. Now you need to retreat about half a millimeter from both edges and mark with a line. Now from each resulting line we measure three centimeters to the center of the figure. We draw lines. Be sure to check the evenness of the measured lines several times.

Now we make bends along the marked lines so that we get the body of the future tank. The next task is to make a tank turret. Cut out a rectangle from green cardboard. Dimensions – 8 by 10 centimeters. From the edges we measure a distance of 5 millimeters and 2 centimeters. We draw bends along the lines.

From a rectangle measuring 6 by 10 centimeters, cut out a rectangle and fold it in half twice. We make a triangular shape for the barrel. To do this, we make cuts along the edges and glue the part.

Once all the parts of the tank are ready, we begin assembling it. Initially, the barrel is glued to the turret, and then the turret itself is glued to the hull.


DIY paper tank, diagram for beginners
Why did we need red cardboard? And so that now we can cut out a star and stick it on the front side of our military equipment from paper.

That's all. The work takes about half an hour even for beginners. Your child will be happy to do this kind of activity and teach it to his friends.
Creating paper tanks can be of interest not only to boys, but also to girls. Firstly, these figures will be excellent toys for them. Secondly, the process of creating a figure itself arouses unprecedented interest in children and develops motor skills. And thirdly, during the process of forming such figures, many parents tell their children about the great wars and their features, attracting children to the history of their state. So, how to make a tank out of paper?
Creating paper tanks can interest not only boys, but also girls
A T 34 tank made of paper corresponding to a real vehicle can be glued together using ready-made developments. To do this, you will first need to print the required scan on thick paper. Then you should cut out all the drawn parts.

 To make T 34 from a reamer, you must follow the instructions:
- Fold lines should be found on the cut out elements. A ruler is applied to each of them, and then the free edge of the paper is lifted and ironed. This creates an even fold.
- Once all the folds have been marked, you can proceed to gluing the model.
- The first step is to glue the main body of the tank. To do this, it is advisable to use transparent acrylic glue or quick-drying PVA.
- Then all minor parts are glued to the body.
- Then you can move on to the cannon. First of all, its base is glued together, and only after that the cannon is supplemented with secondary elements. The finished model is glued to the main body of the combat vehicle.
- After this, the caterpillars are assembled. First, the inner circles are made, and only after that they are framed by a single track strip. The finished tracks are attached to the sides of the hull.


It is worth considering that there are different designs of the T 34 tank, which may differ from each other in color scheme and convention. If you can only print a black and white version of the machine, you should color it using acrylic paints before assembly. Such processing of cardboard will give the future toy the appearance of a tank with a natural coating.
Gallery: paper tank (25 photos)


Tank IS 7 made of paper
To make this tank, you should also use a ready-made reamer.


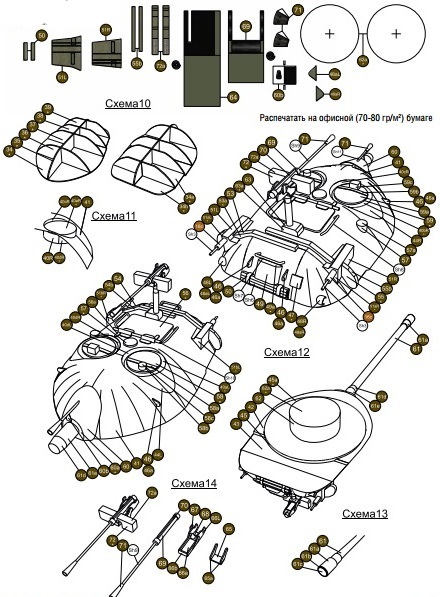


- All elements of the development are cut out using a stationery knife.
- Next, using a ruler, folds are made at all places marked for these purposes.
- The supporting structure for the body is made. It is made from two rectangles installed parallel to each other and secured with 3 transverse strips located at an equal distance from each other.
- A body with a circle cut out in it is glued to the resulting base.
- The sides of the body are pasted over, niches for the caterpillar are formed. A tank bottom is being formed.
- The base for the cannon mount is being made. It is done in the same way as for the body. A manufactured turret is installed on the hull. A machine gun and additional elements are glued to the turret.
- Next, the tracks are made: the middle ones are smooth, the rear ones are with teeth.
- The tracks are glued to the bottom of the main body and secured with caterpillar tracks.
This model is quite complex to assemble, so when creating it with children, it is necessary to provide them with extensive assistance. When assembling it with children, you can dispense with several small parts, thereby simplifying the gluing process.
How to make a T 90 tank out of paper?
T 90 can be made using the origami technique. To do this, you only need paper: A4 sheet and a small sheet of paper for notes.

T 90 can be made using origami technique
How to do:
- First, an A4 sheet is folded. First of all, it bends in half lengthwise.
- The perpendicular sides of the sheet are folded, connecting to each other. First, the short side is applied to the lower long side, and then to the upper one. Similar manipulations should be performed on both sides of the sheet.
- The leaf turns over. The corners of the short side are bent towards the ends of the crosses formed from the fold line.
- The sheet is turned over and folded along the resulting lines, forming the basic shape of a double triangle.
- The long sides are folded towards the middle so that the resulting double triangles are on top of them. The result is a double arrow.
- The newly folded edges are folded towards the outer sides of the rectangle.
- The lateral corners of one of the triangles are bent towards the apex.
- The workpiece is turned over and conditionally divided into 3 parts so that in the end the top of the folded triangle touches the middle of the base of the open one.
- The free corners of the triangle bend inward.
- The “ears” from the previously folded triangle are set into the resulting pockets.
- The result is a tower.
- A small sheet of paper is rolled into a cylindrical shape using a knitting needle or skewer.
- The barrel is inserted into the hole in the turret and glued.
The figurine assembled in this way can be decorated using thick paints, felt-tip pens or pencils.
How to make a tank from origami modules?
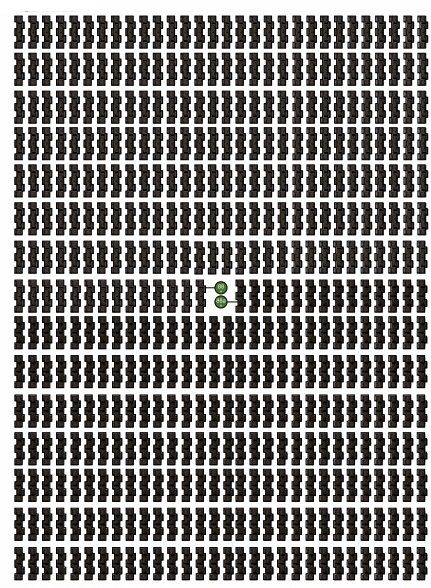
To create tanks, you can use the assembly diagram offered by modular origami. To begin, the assembler will need to prepare 1688 triangular modules.
How to assemble:
- First of all, the tower is assembled. Her first and second rows close in a circle. Each row consists of 30 modules.
- The workpiece is turned inside out and supplemented with a third layer consisting of a similar number of elements. In this way, the tower is built up to layer 8.
- The ninth row is assembled from 30 modules, but they should be installed backwards.
- Next you need to start working on the tracks. A chain of 4 rows is made, each of which has 50 modules.
- The fifth row uses 46 elements. The reduction should be carried out in places where the track bends.
- Row 7 consists of 46 elements installed backwards.
- The same scheme is used to create the second caterpillar.
- For each caterpillar, 3 wheels are made. To do this, a circle is made of 2 rows, each of which involves 10 modules. The figure is turned inside out and completed with 5 rows.
- The wheels are placed inside the caterpillar. These elements are connected by a middle bar made of 34 rows: 1 – 5 modules, 2 – 4 elements. Next, the rows alternate.
- A slightly bent piece is inserted between the tracks.
- A tower is placed on top.
- The cannon is made of 20 rows, the width of which alternates: 1st row - 2 elements, 2nd row - 1. The last three rows increase to 4, 3 and 4 elements.
- The machine gun is inserted into the turret.

Creating a tank from modules is painstaking work
It is worth considering that such a figure is of a decorative nature and is not suitable for play. This is due to the fact that assembly occurs without the use of glue.
How to make modules?
To make a tank you will need:
- 106 sheets of xerox green paper;
- scissors.
To make modules for assembling a tank, you must follow the following instructions:
- 16 rectangles are cut from each sheet.
- Each rectangle is folded in half lengthwise.
- Then the resulting narrow rectangle is bent crosswise in half.
- The upper (non-expanding) parts of the rectangle are applied to the resulting middle.
- The figure is turned over, and its free ends are bent upward.
- The protruding corner is hidden inside the figure.
- The workpiece is folded in half.
The module is ready, all that remains is to assemble a tank figurine from them.
DIY paper tank (video)
Assembling a tank from paper is quite difficult. However, this process can be facilitated by following all the recommendations given in the instructions for it. As a result of this approach, you can get a tank as close as possible to the real thing.
We will show you and describe step by step how to make a paper tank with your own hands. This tank model is the most popular. To make a paper tank with your own hands you just need a sheet of A4 paper and scissors.
Instructions for making a paper tank with your own hands.
First, let's prepare everything you need for origami, namely two sheets of paper, first A4, format 30x21 centimeters, second 5x3 cm and scissors. You can also take colored paper. In this case, your origami will immediately take on a unique look.
1. Place a large sheet of paper in front of you as shown in the photo.

2.
Fold in half, along the long side. 
3.
Bend and then straighten one corner first. 
4.
Then do the same with the second corner. 
5.
Do the same on the second side of our sheet (steps 3-4) 
6.
Next, we need to carefully bend both sides so that on the fold line there is a central point formed from two diagonal lines. For clarity, you can look at the photo. 
7.
Fold the corners inward along the fold lines. There are 8 corners in total. 
8.
We place the figure in front of us and bend the top corner down on each side. 
9.
Fold the top of the workpiece until it touches the center line. 
10.
Fold the same strip in half, bending the bottom edge up. 
11.
Then we bend the corners in the other direction so that they don’t interfere with us for now. We do the same as described in paragraphs 9, 10. 
12.
Bend the corners in different directions as they were originally made. 
13.
Place the figure on the table as in the picture. Fold the top corners in half. 
14.
Turn the tank model over to the other side. 
15.
Fold the layout into a ring. Our figure should be fixed, and the large angles should be on top. 
16.
We are making the turret of our tank. We tuck the large upper corners into the folds of the triangles located below. 
17.
As a result, we will get just such a paper model of a tank, only without a gun. 
18.
Now it’s the turn of the small piece of paper that we prepared at the very beginning of the master class. We make a tube out of it. 
19.
We install the cannon in the hole in front. We unbend the folds on both sides at the base, thereby creating caterpillars. 
20. Congratulations, you have made a paper tank with your own hands.
How to make a paper tank video.
Don't be upset if you don't get the craft right the first time. In this case, try again to go through all the stages of assembling origami. Now you know how to make a paper tank.
Don’t forget, we take criticism well, if you don’t like the description of any step in describing origami, leave a review in the comments.
Lena Novikova
Master class on the topic: " Tank".
I want to continue what I started topic: February 23 - Day of Defenders of the Fatherland! To decorate a corner dedicated to this significant date, you can make a tank too. After all, when introducing children to different branches of the military, it is necessary to mention tankers. Tank We build on the same principle as a ship. So we will need the following materials:
1. Black cardboard, corrugated cardboard, colored paper.
2. A milk carton and a small tea box.
3. Old felt-tip pen, the lid from the jar of vitamins and toothpaste is small.
4. PVA glue, glue gun.
5. Scissors, awl, stationery knife.

First, we cover both boxes with green paper and glue them together.

We are preparing parts for mounting the wheels. Cut out 8 large and 4 small wheels from thick and black cardboard. We pierce them with an awl in the middle.

We mount the wheels to tank. We insert a furniture nail into each wheel. Then we use an awl to make punctures in the body tank and insert the wheel on the nail there, having previously lubricated it with glue.

Prepare 2 corrugated strips cardboard.

Glue the tracks around the wheels tank on both sides.

We cut a hole for the hatch with a utility knife. and glue the cover onto the hatch.

Glue to tank 2 fuel tanks - you can take 2 old hot rollers. You can glue shells from plastic dowels, you can make tankers out of traffic jams.

We paint all plastic parts. Available in black, green or metallic. I took bronze acrylic paint.

Last step: making a stand for a tank and design the composition.

Congratulations! All is ready!
Publications on the topic:
The group spent a week on the lexical topic "Pisces". The following tasks were set: to clarify children’s ideas about fish and their appearance.
1 word Reading (retelling) by the teacher of E. Permyak’s story “What are hands for?” “Petya and grandfather were great friends and loved to ask questions.
Form of implementation: pedagogical workshop. Participants: educators. The purpose of the master class: mastering and subsequent application of physical exercises.
Goal: Dissemination of pedagogical experience in the use of health-saving technologies in the educational process. Tasks:.
“Development of research activities of preschool children” Dear colleagues! I invite you all to stand in a circle. Today is ours.
Master class on the topic: “All the flowers are for you, my love!” (we draw with plasticine) “How beautiful spring bouquets are, but women are more beautiful than flowers.”
Master class of educational activities on psychological communication on the topic: “The Magical Land of Emotions” (for pupils 5 – 7 years old) Purpose: To consolidate knowledge.
