Types of painting. Artistic painting
We will paint the kitchen board. Let's draw a rose.
We will need:

This is the kitchen board I bought:

It is small, 20x15 cm, made of some kind of dense, non-resinous wood. Well sanded, so no pre-treatment is required.
Draw a pencil drawing. Try not to press too hard when drawing, because... doesn't wash well. Don't worry, the pencil will be visible under the paint. If you are not confident in your abilities, you can translate the picture you like; I think it’s better by pressing along the contours.

Let's start coloring. After painting, immediately rinse the brush thoroughly, because if the paint on the brush dries, just throw away the brush. Apply each layer after the previous one has completely dried. You can dry it with a hairdryer, but, in principle, the paints dry quite quickly. First, we apply the general background with a thick brush and dilute the paint with water on the palette. (in the photo below the leaves are shiny because the paint has not dried)

(We dilute the paint with water only to apply the general background of the picture, then we paint with thick paint, only slightly wetting the tip of the brush so that the paint does not spread). Then with a thin brush we draw the darker areas of the flower. Draw lines in the direction of the veins of the petals, from the base.

The closer to the base, the darker the shades. Finally, apply white paint to the curves of the petals. This will make the flower look more voluminous.
On the leaves, first draw veins - from the stem, from the central vein, then - the teeth on the edges, trying to draw with a thin brush from the edge, rounding towards the veins. Finally, apply yellow paint where (in your opinion) the sun’s glare falls).

If necessary, use a thin brush to additionally draw the contours of the petals with a darker shade.
Now let’s draw the ornament with a marker. If you don't have a marker, you can apply it with a thin brush.

If you have a burning device, you can burn it out. I wanted to do just that, but I couldn’t find the burner (I hid it somewhere safe). In general, I like the scorched ornament better, but... now let’s add a little volume to the ornament with white paint. Let's paint the perimeter of the board.
To fix the drawing more reliably, we will cover everything with 2-3 layers of acrylic varnish or acrylic glue, which, in my opinion, is the same thing, only in different concentrations.

Acrylic varnish is not poisonous (note that I didn't say that).

Wood painting is considered one of the oldest types of creativity and drawing. This method of decoration was widespread in Rus'; wooden boards were painted, panels, trays and boxes were decorated with paints. To learn how to decorate wooden objects yourself, you just need to learn the basic painting techniques.
This type of decorative and applied art has been passed down from generation to generation. Adults and children painted original patterns based on folk motifs, which were later framed. Decorating by painting various interior items was considered popular. In this form, this art has survived to this day, when furniture, dishes, toys, and musical instruments are decorated with decorative painting on wood.

Craftsmen use coloring compounds for various purposes as materials for their work. You can paint on wood with gouache, acrylic, watercolor and even oil. Making your own beautiful painted board for cutting food is not difficult even for a child: the whole process consists of selecting a design, transferring it to the surface, and gradually decorating it. It is important to achieve the right combination of colors so that the boards look harmonious.
There are three types of painting techniques:
- Khokhloma - characterized by a black background, as well as yellow and red colors, where fancy flowers are depicted.

- – the main motifs are drawings dedicated to urban scenes, epics and flower arrangements.

- - a type of painting on wood, the main subjects of which are ornaments and horses.

To learn how to paint on wood, you need to familiarize yourself with the basic techniques, which you can learn about in the following sections.
How to paint a kitchen board with acrylic paints?
The most convenient material for getting acquainted with folk art and mastering technology is acrylic paints. They are thick enough and can be mixed to achieve a spectacular image. After painting a wooden board with such paints, it is not necessary to varnish the surface, because acrylic creates a durable protective film.
To work you will need:
- kitchen cutting board with a smooth surface;
- specified paints of the required colors;
- tassels;
- stencils for painting.
Choose high-quality artistic acrylic paints that have sufficient thickness - this is how the drawing will be rich.

The surface of the board must be flat; if there are protrusions on it, it is recommended to use sandpaper and sand the surface of the wood. After this, the masters recommend saturating the base with white acrylic so that subsequent sketches will lie flat on the board. While the workpiece is drying, you need to transfer the design onto wood, you can find out how to do this in the last section of this material.
The peculiarity of the products obtained after painting is that they have a bright and rich color. You need to start painting the board with large elements of the design, gradually moving on to smaller details. To highlight individual details of the image, paint them with a thin brush in black or white.

After painting on wood with acrylic paints, the product must be thoroughly dried. The next step will be varnishing the board if the product is intended to be used for its intended purpose. If the finished result will serve only a decorative function, then there is no need to varnish the board - painting with acrylic paints will stick to the wood on its own.
In the video: painting a cutting board with acrylic paints.
Painting wood with watercolors and its features
The technology of painting wooden bases with watercolors involves quickly applying paint to the surface. Some argue that watercolor is completely unsuitable for such coatings, because excessive wetting of the wood leads to its damage. You can correct the situation and learn how to properly paint on wood with watercolors - you just need to choose the right technique.
For beginners, painting with watercolors should not be a complicated procedure; you can practice on wooden blanks in the form of nesting dolls. After transferring the drawing, you need to brush it once with a wet brush over the area of the workpiece that needs to be painted. This is done for better paint adhesion. Step by step, large areas are first painted, and then colors are added to the details.
The use of watercolor on wood has a number of features:
- the ability to create light and airy images, equipping them with shadows and color transitions;
- lack of relief of the stroke, which cannot be said about painting wooden bases with acrylic or oil paints;
- a face painted on wood in watercolor most accurately conveys the shades truthfully;
- the ability to mix watercolors with other types of paints for painting on wood.
The finished product can be coated with clear varnish. Watercolors are also used to decorate backgrounds on panels, because this paint is a pigment diluted with water, which is most optimal for large areas.
Gouache for painting as an alternative
A cutting board for the kitchen is one of the practical items of regular use. To make this accessory pleasing to the eye every day, it is recommended to paint it; this can be done with gouache paints on wood. This coloring material is similar to acrylic, but is slightly inferior in saturation.

Painting on wood with gouache consists of the following stages:
- Sanding the board. If the surface of the product was not smooth enough, it must be polished with sandpaper.
- Structure protection. If the board does not have a varnish coating, it must be treated with stain.
- Priming. For this, acrylic of any suitable color is used. The wooden board should be carefully coated with paint without gaps. This will make coloring easy and quick.
- Drawing. After translating the image or drawing it yourself, you need to start painting on the board. For beginners, it is better to choose simple patterns or floral motifs. Before painting the tree with gouache, you can add a little PVA glue to the jar for better adhesion.
- Varnishing. After finishing the process, it is recommended to open the product with varnish. You can use any composition that you have at home, but odorless acrylic varnish is considered the most suitable.
The master class presented in the photo below is designed for people who do not have the skills to paint kitchen boards. Painting on wood brings pleasure, and the resulting result delights everyone around you.

It is necessary to apply varnish to the finished product in several layers, but after the previous layer has completely dried. The kitchen is a place where moisture is constantly exposed, so this stage is considered mandatory.

Methods for transferring a drawing onto a base
Some fans of painting on wood only with experience begin to draw pictures on wood on their own. Beginners cannot do this, so the question arises, what are the ways to transfer a picture onto a wooden base? You can find out more about them below:
- Carbon copy. This method is considered the simplest - it requires regular dark or (in the case of a black base) white carbon paper. The printed sheet is placed on a carbon copy, under which a wooden blank is placed. Using a pen, the drawing is completely outlined. As a result, an image is formed on the workpiece that can be painted. The resulting painted product is neat.

- Tracing paper. To make the painting have beautiful borders, you can use tracing paper. To do this, it is applied to the prepared drawing and traced along its contours. Next, the sheet is turned over and rubbed generously with graphite. After this, tracing paper is placed on the tree and the image is traced with a sharp object. Using this method it is possible to draw even the most complex patterns.

- Soap. The method is similar to the previous one, but it is good when the templates for painting are transferred to a black surface. It is necessary to repeat the same operations, only rub the tracing paper not with graphite, but with soap.
To hone your skills, experts recommend using different wood painting techniques. It’s also a good idea to paint on a former wooden base for a tray, on a box or other things. The resulting products can be given as a gift or used to decorate your home.
Master classes on painting wood (2 videos)
Various options and ideas (30 photos)


Workpiece selection and processing
Regardless of what you are going to paint, choose your blank carefully. There should be no noticeable damage such as cracks, chips, or knots. A blank purchased from an art supply store usually does not need to be washed. If there is noticeable dirt, wash the board with a stiff brush, possibly with soapy water, and let it dry. If there are noticeable irregularities, level the surface with coarse sandpaper and then sand with fine sandpaper. Apply primer and let the board dry.Drawing
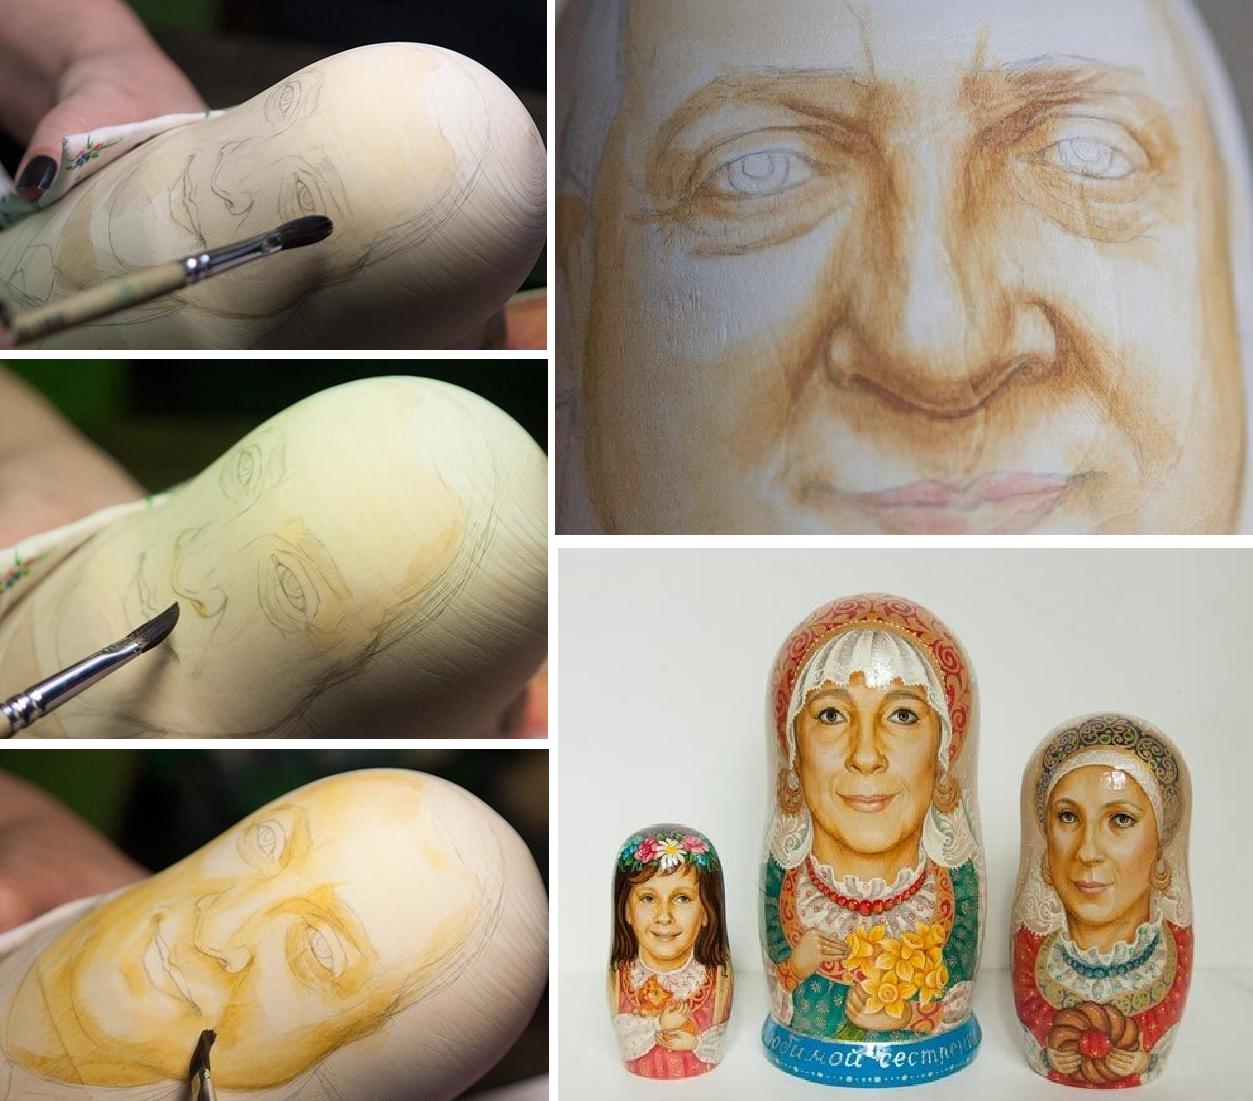
Drawing is possible. An ordinary pencil fits well on primed wood. You can take the finished composition and transfer it to the board using carbon paper. Try to choose patterns with clear outlines and few small details. The subject matter can be different: floral and geometric patterns, landscape, still life, even portrait. Of course, if you are painting an animal figurine or a nesting doll, apply all the necessary details - a muzzle or face, stripes on a cat, a scarf and apron on a nesting doll, etc.painting
Start painting with the largest details. To do this, choose the widest brush. Apply the paint in an even layer. If you are painting a vertical figure, start applying paint from the top. Acrylic paints can be too thick, then they need to be diluted with water. After the large fields are filled in, let the workpiece dry, and then begin working on the smaller details. The last stage is working out very small details and drawing contours with a very thin brush. If you do not use acrylic paints, but, say, gouache or watercolor, the work will need to be varnished. Colorless parquet varnish is more suitable in this situation than others.All photos from the article
Wood painting is a fairly old, but still quite relevant technique for making decorative objects, which is also used in interior work. To master this technique, no special skills are required (however, the better you draw, the better the result will be), so our article will be useful not only for experienced masters, but also for beginners.

Materials for work
Paint selection
Naturally, if we are going to draw, then the choice of art materials will be one of the first places. Today, both professionals and amateurs use a variety of wood paints for painting, and so that you can make a choice, we have compiled a small table:

| Dye | Peculiarities |
| Acrylic | Water-based and hydro-alcoholic acrylic paints are undoubtedly the best choice for many decorative projects, and wood painting is no exception. Artistic acrylic:
The only significant drawback of acrylic paints is the rather high price: compositions from “name” manufacturers cost quite a lot. And if you consider that sometimes you need a whole palette to paint, the total amount will be, to put it mildly, impressive. |
| Tempera | Acrylic is used somewhat less frequently because it is more difficult to apply. At the same time, tempera painting is used when it is necessary to convey natural, softer colors. Tempera is also highly opaque and dries well without warping or cracking. |
| Gouache | Gouache paints for decorating wooden surfaces are used somewhat less frequently, since gouache is not durable and therefore requires additional protection (varnishing, glazing). This deficiency can be partially compensated for by thickening the gouache. To do this, add from 15 to 30% (by volume) PVA glue to the paint container. |
| Watercolor | Watercolor paints are very rarely used as an independent pigment, since their structure does not allow for clear contours. Due to the high water content, the color stain spreads as the pigment moves along the fibers. At the same time, painting on wood with watercolors is used as an auxiliary technique, for example, for tinting areas when carving or burning. |

Naturally, here we have described only the most extensive groups of decorative compositions that are used in decoration. Today, there are dozens of large brands on the market, and palettes contain hundreds and thousands of different shades, so finding the right paint is not difficult.
Components and Tools

Different types of wood painting require the use of different techniques and techniques, but the artist’s set of tools and additional materials will still be approximately the same. Below we provide an indicative list that can be considered a “minimum program”. Start with this list, and over time, as you get involved in the work, you will understand exactly what you need to add.
So, to prepare wooden surfaces for painting, the following are used:
- Skins with different grain sizes for sanding wood.
- Putties for filling defects and gaps between individual parts.
Pay attention!
You can buy it ready-made, or you can make it yourself by mixing PVA glue, small sawdust and oil paint of the desired shade.
It is advisable that the putty be at least no darker than the main part, since in this case you will have to spend time and effort on masking the dark spot.
- Water, alcohol or oil stains.
- Paints in cans for quick application of a primer layer.
- Primers for wood (special artistic or universal, based on an aqueous solution of PVA glue).
If we talk about the decorating process itself, the wood painting technology involves the use of the following tools:

- Art brushes of different sizes(from No. 0 to No. 10). The best materials to choose are core brushes, but they are quite expensive. It is for this reason that beginners are advised to master the painting technique with “squirrel” brushes or bristle products, and only then switch to expensive products.
Pay attention!
If you have never done painting or drawing at all before, then you can try your hand at using synthetic brushes.
Their quality is not so great, but the cost is quite affordable.
- Varnish brushes– wider, often flat in shape. They can be either natural or synthetic, depending on what particular composition is planned to be used for varnishing wood.
- Rollers – for processing large surfaces.
- Airbrushes are used by professionals to quickly apply designs and create smooth color gradients. When using airbrushing, stencils for painting on wood with acrylic paints, made of cardboard or thin plastic, are often used.

Among the auxiliary items are:
- Palette – a wooden or plastic plate for mixing paints.
- Painting tape - for creating straight lines and protecting areas.
- Rags - for wiping hands, brushes, and also for quickly removing drops of paint from various surfaces.
- Jars of water - for washing brushes and diluting paint.
Pay attention!
When working with alcohol-based art acrylic, instead of water, experts recommend using a mixture of vodka and water (1:1).
The use of such a mixture allows you to apply acrylic paints evenly, without streaks or flow.
Painting technique
Surface preparation
Now that we have everything we need, we can get to work. Below are instructions that describe the methodology for performing basic operations for painting a wooden product.

Advice!
A novice artist should practice on blanks that can easily be found in specialized stores.
If you have mastered the basics, then you can move on to decorating furniture, making decorative panels, etc.
In order for the paint to lay evenly and adhere firmly, the wood must be prepared for painting.
This is done like this:
- If the object is made of several parts, then all the cracks between them must be carefully filled with putty. After completing the putty, leave the product until the material dries and becomes hard enough for sanding.
- We take sandpaper and process the surfaces to be painted to remove all irregularities. In this case, it is important to gradually reduce the size of the abrasive grain: this way we will get a uniform silky texture.

- When processing, make sure that the sandpaper does not create burrs. To do this, we perform all movements exclusively along the fibers.
- Having completed sanding, remove dust from the surface. To do this, just wipe the wood with a damp cloth and let it dry.
After drying, move on to the primer.
There are two ways to do this:
- Firstly, the wood can be impregnated with stain.
- Secondly, you can apply a primer coat. We can use PVA glue diluted with water, paint in an aerosol can (preferably matte) or acrylic/tempera paint, which we apply with a wide brush or roller.

Pay attention!
Since acrylic paints for painting on wood have good coverage, they can also be used on dark soil.
But tempera or watercolor have a fairly transparent texture, so the dark base will show through, so it’s better to use a light base.
Drawing contours
Even if you are good at painting techniques, you still need to work according to a previously drawn sketch.
In this case, you can create an image on a wooden surface in several ways:
- Firstly, we can draw the ornament or picture we need with a simple pencil. To make the work easier, we apply a scale grid to the object, and then draw on it, observing the proportions.

- Secondly, you can copy the finished drawing. We print the image on the printer, place a sheet of copy paper under it and trace the contours with a simple pencil or plastic rod.
Advice!
Traces from carbon paper on wood are easily erased, so painting must be done carefully, trying not to erase the lines.
- Thirdly, geometric patterns are often not copied, but re-cut. To do this, we fix the sheet with the pattern on top of the board and use a thin needle to make shallow punctures on the wood at key points. After this, we remove the paper and connect the marks on the tree with lines using a ruler.
- Finally, you can use ready-made templates for painting on wood. And although they are usually used directly at the stage of applying paint, using a template or stencil we can copy the desired design, which will allow us to guide ourselves when painting.
In some cases, the matter is not limited to simply drawing a contour. The depicted lines can either be cut with a cutter, forming relief indentations, or processed with a burner. In this case, decoration will be done using a combined technique.
Painting and varnishing
Now we have everything ready, and we can begin the painting process itself.
At this stage, the result directly depends on your skill, so below we will provide only basic tips:

- Before starting work, thoroughly mix all the paints. It is especially important to shake jars with acrylic and gouache thoroughly: due to long-term storage, these compositions separate and the pigment settles to the bottom.
- Then put a small amount of paint on the palette and dilute it with water to the desired consistency. Paints in jars can sometimes be used without dilution, but even in this case the brush must be moistened generously. If this is not done, the pigment will lie unevenly, and when drying it will crack and deform.

- We paint with even strokes, applying paint in several layers if necessary. First, we draw large elements and paint over background areas, then move on to small details.
Advice!
To depict similar repeating parts of a pattern - stars, flowers, snowflakes, etc. – stencils are used for painting on wood.
It’s better to spend half an hour cutting out a template in a sheet of plastic, but then “stamp” the details of the ornament that perfectly match in shape and size in a few seconds.
After completing the painting, the drawing should be protected.
To do this, we perform varnishing:
- Apply the first layer of nitro varnish (nitrocellulose transparent composition, marked NC). Apply a thin layer of nitro varnish directly onto the paint and leave to dry for an hour.

- As a second layer, you can use artistic pentaphthalic varnish (PF), as well as alkyd-urethane (AU) and alkyd-acrylic (AC) compositions. They will provide reliable protection of the design and the wooden base from moisture.
- The third layer is also applied with artistic compositions using pentaphthalic or oil varnishes.
After varnishing is completed, the product can be used without fear of damaging the design.
Conclusion
Any of us can master painting on wood with acrylic paints and other compositions. Of course, to achieve excellent results, you will have to improve your drawing technique, but using stencils and templates, and also focusing on the tips that the video contains in this article, you can quite successfully cope with most tasks, even without being an artist.
From time immemorial, humanity has been painting various surfaces with paints - stones, wood, leather and other materials on which dyes were applied. At the same time, a wide variety of materials were used as paint - clay of various colors, tree resin, soot. One of the most popular materials for painting is wood - many household items were originally made of wood, furniture, and the houses themselves were also made of wood, and the desire for beauty has always been inherent in humanity, so they decorated the surrounding objects with everything that was at hand. Painting on wood using high-quality acrylic paints is becoming especially popular, as it allows you to plunge into the world of distant ancestors and take your mind off the stress and frantic rhythm of the modern world.
At the same time, you don’t have to be a professional master of this or that type of painting - stores have a large quantity of necessary materials and tools that will help you master any technique in a fairly short time. If this is not enough, then various educational institutions will be happy to offer you to attend courses for beginners at a time convenient for you.
We study painting on wood with acrylic paints with a description of the work
Painting on wood is most suitable for beginning artists to work with acrylic paints - they are bright, easy to apply and waterproof, while they are practically odorless and easy to work with.
There are different types of painting that originated at different times and in different places in our country, but they all originate in ancient times, when people lived in harmony with nature and the world around them.
One of these types of painting is Khokhloma painting, in which the main elements are grass, flowers, berries, that is, the pictures reflect the entire plant world surrounding a person. This type of painting got its name from the name of the village of Khokhloma, near which it originated.

Another popular folk painting technique originated in a small town on the Volga called Gorodets and was called Gorodets painting. A distinctive feature of this type of painting is that animals are always depicted in profile, and people in full face. The main theme of this type of painting is the everyday life of ordinary people - walks along city streets, fair festivities, weddings, and at the same time, the paintings are always saturated with bright colors that frame them in the form of garlands, wreaths or simply bouquets scattered throughout the picture.
In addition to these two types of wood painting, there is another decorative technique that is no less popular - Mezen painting. Its distinctive features are the use of only two colors in the designs - red and black, as well as a rather symbolic image of various elements (the main motifs are solar disks, rhombuses and crosses, which have certain meanings)

Let's take a closer look at painting on wood using the example of a master class on decorating a wooden board. We will use acrylic paints, as they are the most convenient for working at the stage of getting acquainted with this type of folk art. In this case, the board is also the most convenient object from which you can begin to master the painting technique.
Master class on painting a wooden board with your own hands
Acrylic paints are very easy to use, adhere well to a wooden surface and, after drying, form a waterproof film, so the painted product does not need to be varnished.
Materials and tools required:
- Wooden cutting board;
- Acrylic paint;
- Brushes;
- Carbon paper (to transfer the drawing onto the board).
First you need to prepare the surface you are going to paint. To do this, cover the board with an even layer of white paint - this is necessary in order to level the surface and saturate the pores of the wood, so that further layers of paint will lay down more evenly.

While the board is drying, you can draw a sketch of the future design on paper. Of course, if your artistic skills allow you to draw directly on the board, then you can do without preliminary drawings.

Let's start coloring. To make a bright board, we will use paints of different colors and shades.

Using a thin brush and black paint we decorate the centers of the flowers, and using white paint we paint the berries, flower petals and leaves with thin lines.

A bright and colorful food cutting board is ready. After drying, it can be varnished to better fix the colors, but if the product will only serve a decorative function, you can do without varnishing.
Wood painting is a great way to create unique products with acrylic paints with your own hands, which can be used in everyday life, used as interior decoration, or gifted to a loved one. The technology of this type of creativity is so simple that even a child can master it with a little help from adults.
Video on the topic of the article
In conclusion, we invite you to watch several videos about painting various products with acrylic paints in order to give uniqueness and originality to things, as well as the interior of your home.
